Getting Started with Siren ER
Entity Resolution
Entity Resolution is the AI capability to recognize that two or more records
might be referring to the same real world entity (e.g. a person or company) or are significantly related. Siren ER integrates Senzing Entity Resolution software into the Siren platform allowing resolution of records from different data sources with different schemas in real time. Using Siren ER we can have a data model where real world entities ![]() are represented by one Entity Table, entity2record, whose records connect back to any input records
are represented by one Entity Table, entity2record, whose records connect back to any input records ![]() that are deemed to be the same as that entity, and entity relations
that are deemed to be the same as that entity, and entity relations ![]() are represented by another Entity Table, entityrels, which connects to two entities that are related by sharing certain details like addresses, but are not the same.
are represented by another Entity Table, entityrels, which connects to two entities that are related by sharing certain details like addresses, but are not the same.
Here we will describe how to set up an Entity Resolution pipeline and process a set of records. Siren ER consists of a pipeline with several components that can take records in (or in the process of being ingested into) an Elasticsearch index like customer, and have the record represented in Entities and Entity Relations.
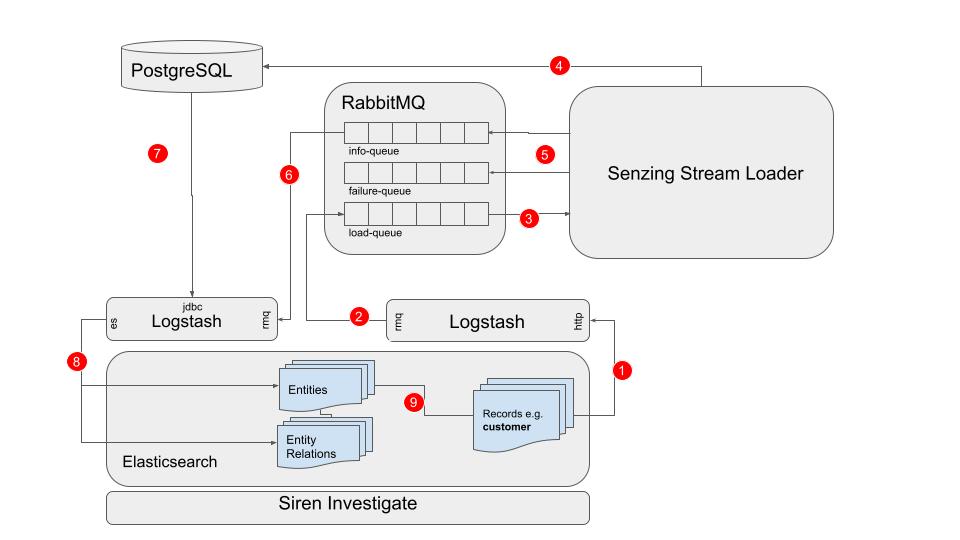
Our recommended pipeline has a number of components. The entity resolution is performed by Senzing Stream Loader, which stores all resolution data in a relational database, typically PostgreSQL. In order to smoothly facilitate high throughput and real-time processing and syncing of the database with Elasticsearch a messaging system is required, typically RabbitMQ. Additionally, two Logstash pipelines are used, one to forward data to RabbitMQ, and a second to sync the most recently updated data from PostgreSQL to Elasticsearch.
-
When a customer record is ingested into Elasticsearch, we can use an Elasticsearch ingest pipeline to extract a Senzing-compatible JSON object using a script processor then send that object to Logstash with a HTTP request using the json-ws processor.
-
A Logstash pipeline, configured with a http input plugin and a rabbitmq output plugin, receives the customer object and forwards it onto the RabbitMQ load-queue.
-
Senzing Stream Loader consumes messages (customer objects) from the RabbitMQ load-queue.
-
Senzing Stream Loader performs the entity resolution and updates the PostgreSQL database accordingly.
-
Senzing Stream Loader adds messages about any entities affected during the resolution to the RabbitMQ info-queue, or, if the record failed to process, the RabbitMQ failure-queue.
-
A Logstash pipeline configured with a rabbitmq input plugin consumes messages from the RabbitMQ info-queue.
-
The same Logstash pipeline uses a JDBC_streaming filter plugin to query PostgreSQL for the latest data for the resolved entities which were referenced in the info-queue messages.
-
The Logstash pipeline overwrites Entity records in Elasticsearch with up to date data for the entities referenced in the info-queue messages, for example new records for a particular entity. If any entities are missing from PostgreSQL, for example if two entities are merged and one is removed, they will be deleted from Elasticsearch.
-
Entity records contain an array field of record ids allowing a relation to the original records. Additionally, entities can be associated with other entities by Entity Relation records.
The following workflow demonstrates a minimal Siren ER pipeline setup and can be performed on a single machine running Docker, a minimum of 32GB memory, 100GB SSD storage and 16 cores.
1. Run the RabbitMQ Docker
First we will run a docker for RabbitMQ since most other components in the pipeline interact with one or more RabbitMQ queues. Copy the files custom.conf and definitions.json into a folder named rabbitmq_conf. This will ensure RabbitMQ is configured with the correct queues and an admin user. Now run the RabbitMQ docker:
docker run -d  -u 1001 -p 0.0.0.0:4369:4369 -p 0.0.0.0:5551:5551 \
-p 0.0.0.0:5552:5552 -p 0.0.0.0:5672:5672 -p 0.0.0.0:25672:25672 \
-p 0.0.0.0:15672:15672 -v /path/to/rabbitmq_conf:/bitnami/rabbitmq/conf \
-e RABBITMQ_DISK_FREE_ABSOLUTE_LIMIT=1GB \
bitnami/rabbitmq@sha256:aed08fb7575370fe516bda449a58524fbd7360fa250d4380c09515bd09ec8b50
| Replace /path/to/rabbitmq_conf with the full path of your rabbitmq_conf directory. |
The RabbitMQ admin interface will now be available at http://localhost:15672
| If connecting from a different machine, replace localhost with the IP address of the RabbitMQ machine. |
Log in with the username user and the password passw0rd and the Queues tab should display four empty queues:

2. Run Logstash to load the RabbitMQ load queue
Now we will run Logstash with a HTTP Input to receive (on port 8080) messages from the Elasticsearch json-ws processor, and a RabbitMQ output, to send messages to the RabbitMQ load-queue (senzing-rabbitmq-queue). Download logstash_http_rabbitmq.conf into a directory logstash_http_rabbitmq_pipeline. Run logstash docker:
docker run -d \
--add-host=host.docker.internal:172.17.0.1 \
-e RABBITMQ_HOST=host.docker.internal \
-e RABBITMQ_USER=user \
-e RABBITMQ_PASSWORD=passw0rd \
-e LOGSTASH_HTTP_PORT=8080 \
-p 8080:8080 \
-v /path/to/logstash_http_rabbitmq_pipeline/:/usr/share/logstash/pipeline/ \
docker.elastic.co/logstash/logstash-oss:8.1.3
| Replace /path/to/logstash_http_rabbitmq_pipeline with the full path to your logstash_http_rabbitmq directory. |
| Replace host.docker.internal with the IP address of RabbitMQ if it is not running locally. |
3. Test loading some data onto the RabbitMQ load queue
Run the Siren Platform Demo Data bundle docker:
docker run -d --name siren \
--add-host=host.docker.internal:172.17.0.1 \
-p 5606:5606 -p 9220:9220 -e sirenlogs=host \
sirensolutions/siren-platform-demo-data:12.1.1
| Set the vm.max_map_count on your host machine according to Elastic documentation to avoid memory issues. |
| Ensure port 5606 is accessible from the IP you will be using to open Siren Investigate from. |
Loading some csv data into Elasticsearch using a json-ws processor to send data to Logstash should now result in messages appearing on the RabbitMQ load queue. Download the customer demo set from Senzing.
Open Investigate at http://[investigate_ip]:5606 and ingest the dataset by following the steps in Importing your first table of demo data in the Siren Easy Start Tutorial, naming the table customer and choosing keyword for all Field mappings and using RECORD_ID for Define identifier value. At the Transform Data step, use the following Additional transform pipeline. It contains three processors:
-
a Painless script processor which adds a new field data whose value is a JSON object which duplicates all the fields in the document. In these sample customer documents all the fields can be understood by Senzing; depending on the fields in your data, this script can be modified to choose which fields to send, and map the fields to equivalent field names that Senzing can process. See the Senzing Generic Entity Specification document for more information on mapping your fields to Senzing fields. This script also sets data.RECORD_ID to customer-person-[RECORD_ID]. When the ids linked to an entity are extracted in a later step, "customer-person" will become a field, whose value is an array of record ids for the records that have been resolved to the entity, which can then make a join from the entity to the original customer records. Having the format [index]|[role] as the field name allows for the creation of different types of relation from a record to its entities, e.g. an arrest record might contain information about the officer and the suspect; we would process these separately as arrest|officer|[officer_id] and arrest|suspect|[suspect_id].
-
a json-ws processor which will POST the data field JSON value to Logstash.
-
a remove processor which removes the data field, as we do not want that in the customer document ingested into Elasticsearch.
| to better view or edit the script processor, paste the JSON into an online JSON parser. |
{
  "processors": [
    {
      "script": {
        "source": "def data = ['DATA_SOURCE' : 'TEST']; for ( def field : ctx.keySet() ) {\n      if((String)field.charAt(0) != '_') {\n          data[field] = ctx[field]\n      }\n}\ndata.RECORD_ID = 'customer'+'|'+'person'+'|'+ctx.RECORD_ID;\nctx.data = data;"
      }
    },
    {
      "json-ws": {
        "resource_name": "senzing",
        "method": "post",
        "url": "http://localhost:8080",
        "input_map": {
          "$.data": "data"
        },
        "output_map": {
          "logstash_response": "$"
        },
        "error_output_field": "json-ws-error"
      }
    },
    {
     "remove": {
        "field": "data"
      }
    }
  ]
}
After the import is complete you should see 90 documents in the load queue:

You will also now have a customer Entity Table in Investigate. Go ahead and create a dashboard for it according to Creating dashboards automatically in the Easy Start Tutorial.
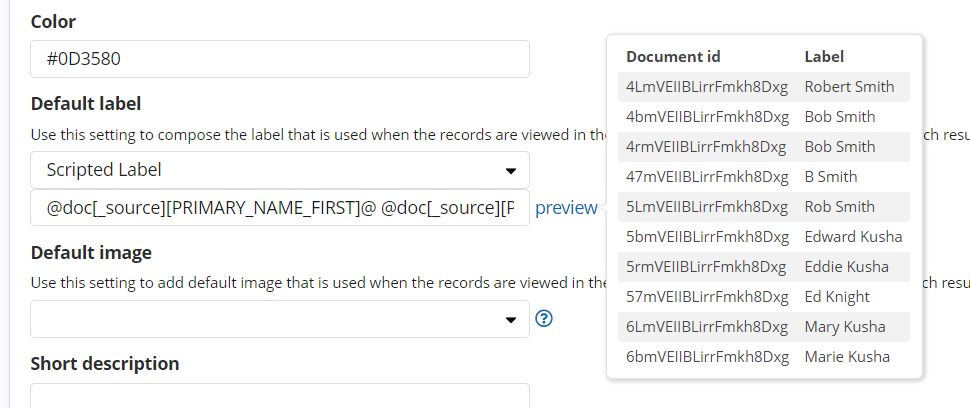
| In the Entity Table Info tab, to have customers names as labels in the Graph Browser, use the following Scripted Label for Default label: @doc[_source][PRIMARY_NAME_FIRST]@ @doc[_source][PRIMARY_NAME_LAST]@ |
4. Install and Configure Senzing
Database
Senzing uses PostgreSQL as a datastore, so you’ll need to have a PostgreSQL running with a user named g2 and password password, and a database named G2 with user g2 as its owner.
docker run -d \
--name postgresql \
-e POSTGRES_USER=g2 \
-e POSTGRES_PASSWORD=password \
-e POSTGRES_DB=G2 \
-p 5432:5432 \
postgres:14-alpine
Download and install Senzing
# download senzing
export SENZING_RPM_DIR=/home/user/senzing/downloads
mkdir -p ${SENZING_RPM_DIR}
sudo docker run --rm --volume ${SENZING_RPM_DIR}:/download \
senzing/yumdownloader senzingapi-3.1.2-22182 senzingdata-v3
# install senzing
export SENZING_VOLUME=/home/user/senzing/senzing
mkdir ${SENZING_VOLUME}
sudo docker run --rm \
--volume ${SENZING_VOLUME}/data:/opt/senzing/data \
--volume ${SENZING_VOLUME}/g2:/opt/senzing/g2 \
--volume ${SENZING_RPM_DIR}:/data \
--env SENZING_ACCEPT_EULA=I_ACCEPT_THE_SENZING_EULA \
senzing/yum:1.1.8 \
-y localinstall /data/senzingdata-v3-3.0.0-22119.x86_64.rpm /data/senzingapi-3.1.2-22182.x86_64.rpm
| Change /home/user to your home space. |
You should now have g2 and data directories in /home/user/senzing/senzing.
Initialise Database for Senzing
Now run the senzing/postgresql-client docker to add Senzing tables to PostgreSQL.
export SENZING_VOLUME=/home/user/senzing/senzing
export DATABASE_HOST=host.docker.internal
export SENZING_DATABASE_URL=postgresql://g2:password@${DATABASE_HOST}:5432/G2
sudo docker run --add-host=host.docker.internal:172.17.0.1 \
-e SENZING_DATABASE_URL=${SENZING_DATABASE_URL} \
-e SENZING_SQL_FILES="/opt/senzing/g2/resources/schema/g2core-schema-postgresql-create.sql /app/insert-senzing-configuration.sql" \
--name senzing-postgres-init --rm --tty \
--volume ${SENZING_VOLUME}/g2:/opt/senzing/g2 senzing/postgresql-client:2.2.0
| If PostgreSQL is not running on the local host machine DATABASE_HOST should be set to the IP of PostgreSQL. |
You should now have 24 tables in your G2 database. Use a database client interface like DBeaver to connect to PostgreSQL.
Initialise Senzing
To initialise your Senzing installation with configuration for PostgreSQL:
export SENZING_VOLUME=/home/user/senzing/senzing
export DATABASE_HOST=host.docker.internal
export SENZING_DATABASE_URL=postgresql://g2:password@${DATABASE_HOST}:5432/G2
sudo docker run --add-host=host.docker.internal:172.17.0.1 --rm --user root  \
--volume ${SENZING_VOLUME}/data/3.0.0:/opt/senzing/data \
--volume ${SENZING_VOLUME}/etc:/etc/opt/senzing \
--volume ${SENZING_VOLUME}/g2:/opt/senzing/g2 \
--volume ${SENZING_VOLUME}/var:/var/opt/senzing \
--env SENZING_DATABASE_URL=${SENZING_DATABASE_URL} senzing/init-container:2.0.1
| Change /home/user to your home space. |
| If PostgreSQL is not running on the local host machine database DATABASE_HOST should be set to the IP of PostgreSQL. |
| If you have a Senzing licence file named g2.lic from Senzing copy it to /home/user/senzing/senzing/etc before running. If not, the default licence will be used which allows up to 100,000 records to be loaded into Senzing. |
You should get an output something like below:
2022-06-13 14:50:28,879 senzing-50070297I Enter {"api_server_client_key_store_base64_encoded": null, "api_server_key_store_base64_encoded": null, "data_dir": "/opt/senzing/data", "db2dsdriver_cfg_contents": null, "debug": false, "delay_in_seconds": 0, "enable_db2": false, "enable_mssql": false, "enable_mysql": false, "enable_postgresql": false, "etc_dir": "/etc/opt/senzing", "g2_config_gtc": null, "g2_dir": "/opt/senzing/g2", "gid": 1001, "governor_url": "https://raw.githubusercontent.com/Senzing/governor-postgresql-transaction-id/master/senzing_governor.py", "license_base64_encoded": null, "mssql_odbc_ini_contents": null, "program_updated": "2022-02-25", "program_version": "1.7.4", "senzing_sdk_version_major": 3, "sleep_time_in_seconds": 0, "start_time": 1655131828.87967, "subcommand": "initialize", "uid": 1001, "update_ini_files": false, "var_dir": "/var/opt/senzing"}
2022-06-13 14:50:28,880 senzing-50070154I /var/opt/senzing/sqlite/G2C.db - Creating file by copying /opt/senzing/g2/resources/templates/G2C.db
2022-06-13 14:50:28,880 senzing-50070154I /var/opt/senzing/sqlite/G2C_LIBFEAT.db - Creating file by copying /opt/senzing/g2/resources/templates/G2C.db
2022-06-13 14:50:28,881 senzing-50070154I /var/opt/senzing/sqlite/G2C_RES.db - Creating file by copying /opt/senzing/g2/resources/templates/G2C.db
2022-06-13 14:50:28,882 senzing-50070156I /etc/opt/senzing/G2Module.ini - Modified. Changed PIPELINE.SUPPORTPATH to /opt/senzing/data
2022-06-13 14:50:28,882 senzing-50070156I /etc/opt/senzing/G2Module.ini - Modified. Changed PIPELINE.CONFIGPATH to /etc/opt/senzing
2022-06-13 14:50:28,882 senzing-50070156I /etc/opt/senzing/G2Module.ini - Modified. Changed PIPELINE.RESOURCEPATH to /opt/senzing/g2/resources
2022-06-13 14:50:28,882 senzing-50070156I /etc/opt/senzing/G2Module.ini - Modified. Removed SQL.G2CONFIGFILE
2022-06-13 14:50:28,883 senzing-50070186I Initializing for PostgreSQL
2022-06-13 14:50:28,883 senzing-50070181I /opt/senzing/g2/python/senzing_governor.py - Postgresql detected. Using existing governor; no change.
2022-06-13 14:50:28,883 senzing-50070152I /var/opt/senzing - Changing owner from 0:0 to 1001:1001
2022-06-13 14:50:28,884 senzing-50070152I /var/opt/senzing/sqlite - Changing owner from 0:0 to 1001:1001
2022-06-13 14:50:28,884 senzing-50070152I /var/opt/senzing/sqlite/G2C.db - Changing owner from 0:0 to 1001:1001
2022-06-13 14:50:28,884 senzing-50070152I /var/opt/senzing/sqlite/G2C_LIBFEAT.db - Changing owner from 0:0 to 1001:1001
2022-06-13 14:50:28,884 senzing-50070152I /var/opt/senzing/sqlite/G2C_RES.db - Changing owner from 0:0 to 1001:1001
2022-06-13 14:50:28,884 senzing-50070151I /etc/opt/senzing/G2Module.ini - Changing permissions from 644 to 750
2022-06-13 14:50:28,884 senzing-50070151I /var/opt/senzing/sqlite - Changing permissions from 755 to 750
2022-06-13 14:50:28,885 senzing-50070151I /var/opt/senzing/sqlite/G2C.db - Changing permissions from 644 to 750
2022-06-13 14:50:28,885 senzing-50070151I /var/opt/senzing/sqlite/G2C_LIBFEAT.db - Changing permissions from 644 to 750
2022-06-13 14:50:28,885 senzing-50070151I /var/opt/senzing/sqlite/G2C_RES.db - Changing permissions from 644 to 750
2022-06-13 14:50:28,885 senzing-50070157I /etc/opt/senzing/G2Config.gtc - Creating file
2022-06-13 14:50:29,286 senzing-50070170I Created new default config in SYS_CFG having ID 4019066234
2022-06-13 14:50:29,286 senzing-50070155I /etc/opt/senzing/g2config.json - Deleting
2022-06-13 14:50:29,286 senzing-50070298I Exit {"api_server_client_key_store_base64_encoded": null, "api_server_key_store_base64_encoded": null, "data_dir": "/opt/senzing/data", "db2dsdriver_cfg_contents": null, "debug": false, "delay_in_seconds": 0, "elapsed_time": 0.40682220458984375, "enable_db2": false, "enable_mssql": false, "enable_mysql": false, "enable_postgresql": false, "etc_dir": "/etc/opt/senzing", "g2_config_gtc": null, "g2_dir": "/opt/senzing/g2", "gid": 1001, "governor_url": "https://raw.githubusercontent.com/Senzing/governor-postgresql-transaction-id/master/senzing_governor.py", "license_base64_encoded": null, "mssql_odbc_ini_contents": null, "program_updated": "2022-02-25", "program_version": "1.7.4", "senzing_sdk_version_major": 3, "sleep_time_in_seconds": 0, "start_time": 1655131828.87967, "stop_time": 1655131829.286492, "subcommand": "initialize", "uid": 1001, "update_ini_files": false, "var_dir": "/var/opt/senzing"}
Run Senzing Stream Loader
Stream Loader reads messages from the load-queue, processes them with Senzing resulting in updates to PostgreSQL, then loads info messages onto the info-queue. To run Stream Loader:
export SENZING_VOLUME=/home/user/senzing/senzing
export DATABASE_HOST=host.docker.internal
export SENZING_DATABASE_URL=postgresql://g2:password@${DATABASE_HOST}:5432/G2
# stream-loader
sudo docker run -d --restart always --add-host=host.docker.internal:172.17.0.1 \
-e SENZING_DATA_SOURCE=TEST \
-e SENZING_DATABASE_URL=${SENZING_DATABASE_URL} \
-e SENZING_ENTITY_TYPE=GENERIC \
-e SENZING_LOG_LEVEL=info \
-e SENZING_MONITORING_PERIOD_IN_SECONDS=60 \
-e SENZING_RABBITMQ_HOST=host.docker.internal \
-e SENZING_RABBITMQ_PASSWORD=passw0rd \
-e SENZING_RABBITMQ_QUEUE=senzing-rabbitmq-queue \
-e SENZING_RABBITMQ_ROUTING_KEY=senzing.records  \
-e SENZING_RABBITMQ_EXCHANGE=senzing-rabbitmq-exchange \
-e SENZING_RABBITMQ_USERNAME=user \
-e SENZING_SUBCOMMAND=rabbitmq-withinfo \
-e SENZING_THREADS_PER_PROCESS=4 \
-e SENZING_RABBITMQ_USE_EXISTING_ENTITIES=true \
-e SENZING_RABBITMQ_HEARTBEAT_IN_SECONDS=10000 \
--volume ${SENZING_VOLUME}/data/3.0.0:/opt/senzing/data \
--volume ${SENZING_VOLUME}/etc:/etc/opt/senzing \
--volume ${SENZING_VOLUME}/g2:/opt/senzing/g2 \
--volume ${SENZING_VOLUME}/var:/var/opt/senzing senzing/stream-loader:2.0.2
| Change /home/user to your home space. |
| If PostgreSQL is not running on the local host machine database DATABASE_HOST should be set to the IP of PostgreSQL. |
| To maximise throughput, set SENZING_THREADS_PER_PROCESS to the number of cores available. Multiple Stream Loaders consuming from the same load-queue can be run across different machines. Typical throughput should be around 10 documents processed per core per second. |
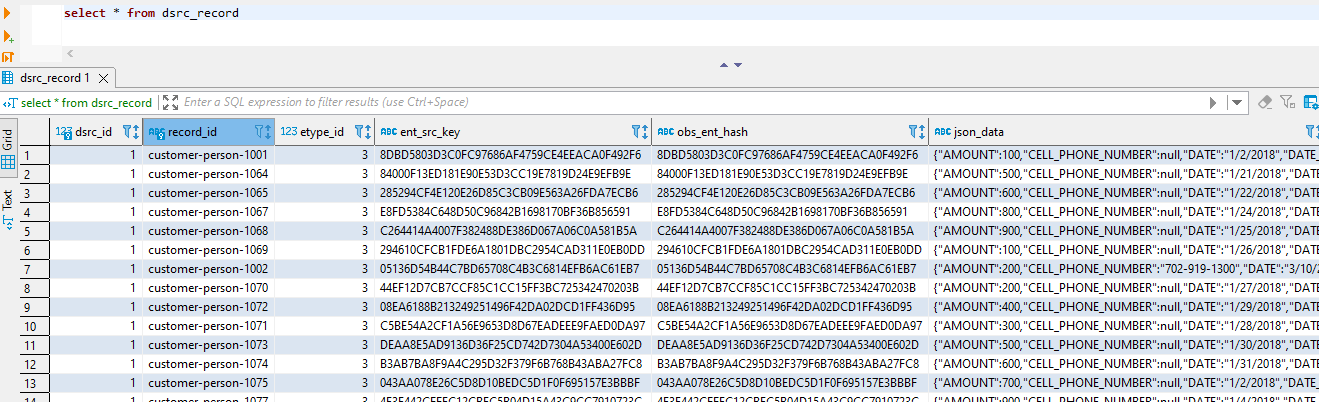
The documents will move from senzing-rabbitmq-queue (the load queue) to senzing-rabbitmq-info-queue. If you run SELECT * FROM DSRC_RECORD on your G2 database you’ll see the records that have been loaded.
6. Run Logstash to update Elasticsearch with updated data from PostgreSQL
A second logstash pipeline can now be run to pull messages from senzing-rabbitmq-info-queue, query PostgreSQL for the data pertaining to the entities in those messages, and update the Elasticsearch entity2record and entityrels indices accordingly. Download a postgresql driver.
Download _attachments/siren_senzing_updater.conf to a directory siren_senzing_updater_pipeline.
docker run  -d \
--add-host=host.docker.internal:172.17.0.1 \
-e RABBITMQ_HOST=host.docker.internal \
-e RABBITMQ_USER=user \
-e RABBITMQ_PASSWORD=passw0rd \
-e DB_HOST=host.docker.internal \
-e DB_USER=g2 \
-e DB_PASSWORD=password \
-e ES_USER=sirenadmin \
-e ES_PASSWORD=password \
-e ES_HOST=host.docker.internal \
-e PASSTHROUGH_FIELDS=AMOUNT,STATUS,PRIMARY_NAME_LAST \
-e DB_DRIVER_PATH=/usr/share/logstash/postgresql-42.4.0.jar \
-e PIPELINE_WORKERS=1 \
-e PIPELINE_BATCH_SIZE=1 \
-v /path/to/siren_senzing_updater_pipeline/:/usr/share/logstash/pipeline/ \
-v /path/to/postgresql-42.4.0.jar:/usr/share/logstash/postgresql-42.4.0.jar \
docker.elastic.co/logstash/logstash-oss:8.1.3
| Replace /path/to/siren_senzing_updater_pipeline with the full path to your siren_senzing_updater_pipeline directory. |
| Replace /path/to/postgresql-42.4.0.jar with the full path to your postgresql-42.4.0.jar file. |
| Replace host.docker.internal with the IP address of any components running on different machines. |
| Any fields that were passed to senzing in your script in step 3 can be pulled from PostgreSQL in the line: passthrough_fields = ["AMOUNT", "STATUS", "PRIMARY_NAME_LAST"] |
| There must be only one instance of this component running as messages must be processed in order. |
The siren-senzing-info-queue should now become empty as the messages are processed and entity and relation records are added to Elasticsearch.
Check there are entity records in Elasticsearch:
GET entity2record/_search
{
  "took" : 1,
  "timed_out" : false,
  "_shards" : {
    "total" : 1,
    "successful" : 1,
    "skipped" : 0,
    "failed" : 0
  },
  "hits" : {
    "total" : {
      "value" : 45,
      "relation" : "eq"
    },
    "max_score" : 1.0,
    "hits" : [
      {
        "_index" : "entity2record",
        "_type" : "_doc",
        "_id" : "100001",
        "_score" : 1.0,
        "_source" : {
          "customer-person" : [
            "1097",
            "1098"
          ],
          "entityid" : 100001,
          "matchcount" : 2,
          "PRIMARY_NAME_LAST" : [
            "Sanchez",
            "Sanchez Mendoza"
          ],
          "matchedrecords" : [
            "customer-person-1097",
            "customer-person-1098"
          ],
          "STATUS" : "Active",
          "AMOUNT" : [
            200,
            300
          ]
        }
      },
      ...
Now let’s view the entities and entity relations in Siren Investigate:
-
Create Entity Tables (using the From Elasticsearch indices option according to the Siren Investigate documentation) and dashboards (again according to Creating dashboards automatically in the Easy Start Tutorial) for the indices entity2record and entityrels. Use the MATCH_KEY field as the Default label for entityrels and the PRIMARY_NAME_LAST field as the Default label for entity2record.
-
Create a relation between the entity2record customer-person.keyword field and the customer RECORD_ID field, called ‘same as' in both directions.
-
Create a relation between the entity2record ENTITYID field and the entityrels MIN_RES_ENT_ID field, called ‘related’ in both directions.
-
Create a relation between entity2record ENTITYID field and the entityrels MAX_RES_ENT_ID field, called ‘related’ in both directions.
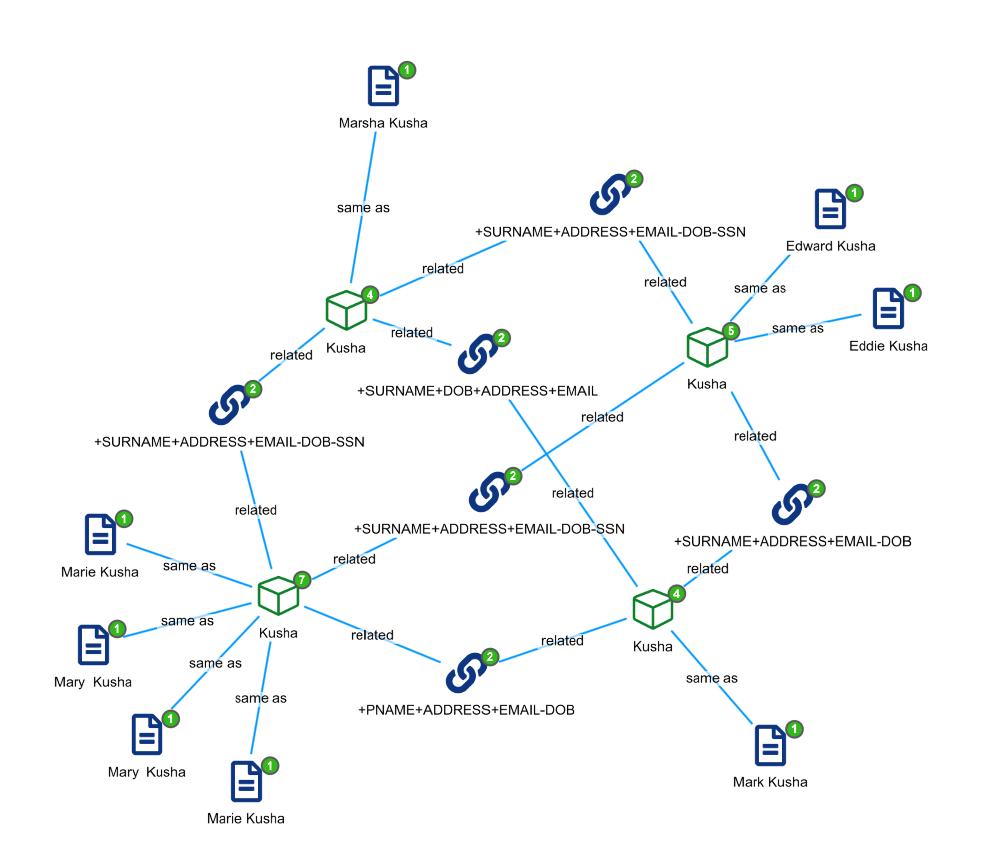
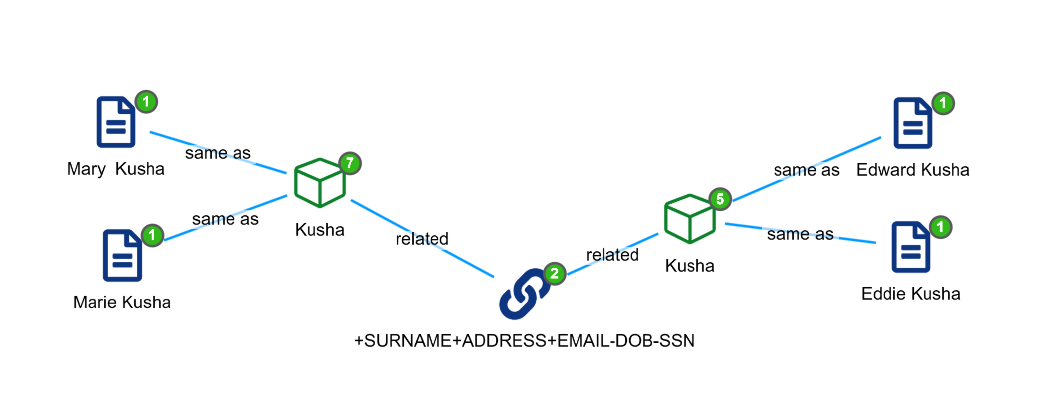
Now add all 90 customer records to the Graph Browser and fully expand their network. You’ll see multiple customer networks something like below. Here, Senzing has detected that 8 customer records are in fact 4 entities which are related through some certain shared attributes.