Importing data
You can import data into an entity table from server, a spreadsheet or from a datasource.
To import data, an entity table and a corresponding Elasticsearch index must exist. To create them in advance, follow the steps in Creating entity tables.
This section describes the process for adding data to an existing entity table.
Example
An analyst receives a file that contains the latest data about investments in companies of interest.
There is already an entity table in the system about investments, so they don’t need to create a new entity table - they need only to add data to the existing one.
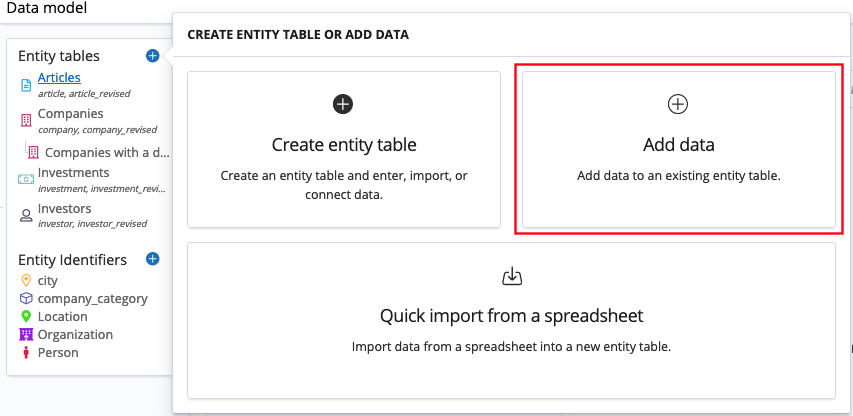
In the Data model app, the analyst can select Add data and can import the new file.
Before you begin
Your system must be configured for security to allow the importing of data. For more information, see Configuring security for data imports.
If you are planning to import data into Siren Investigation from logs, see Importing data by using Logstash.
Importing data from a spreadsheet
|
Importing Excel files that are larger than 20MB can affect the system’s performance. We recommend using CSV files for importing large amounts of data. |
You can import data from common spreadsheet file formats, such as .csv, .tsv, .xls, or .xlsx.
-
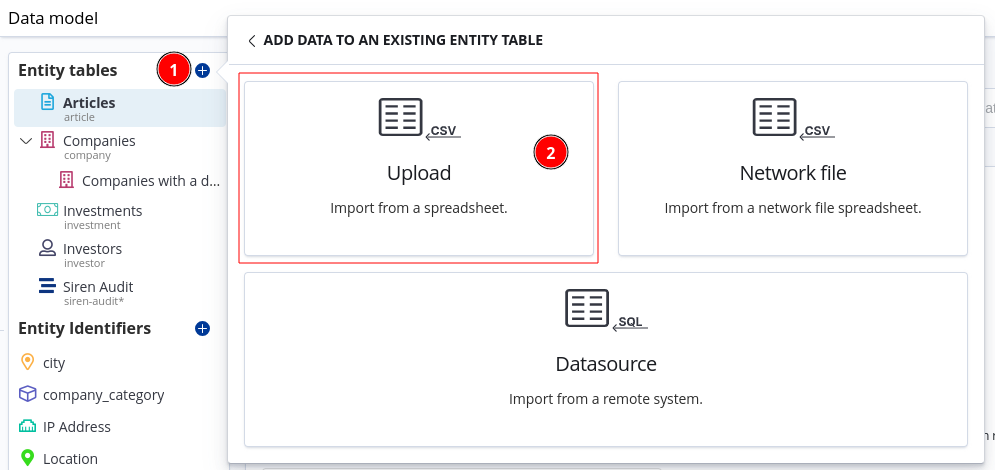
In the Data model app, click Add/Create (the plus symbol).
-
Click Add data.
-
Click Upload.
-
Select a file from your system or drag and drop it into the screen. If you are uploading an Excel file, you can select the sheet that you want to import.
-
(Optional) Configure the following options:
-
Apply header as field names: If selected, the first row of the file will be used to define the field names.
-
Specify a custom delimiter: In cases where commas are not the delimiter in the uploaded file, you can specify another type. Enter the delimiter character in this field, for example a vertical bar (
|) or a colon (:). -
Specify the columns to be loaded as text: Specify the columns you want to be imported as text.
-
Specify the columns to exclude: Specify the columns that you do not want to include in the import.
-
-
Click Next.
-
On the Transform data screen, select the target table from the dropdown menu.
If you decide that you need to create a new entity table for this data, click Create a new table and select Add fields from spreadsheet.
-
(Optional) Use field scripts to transform field data and click Test transformer.
-
Click Transform data and Start loading.
Quick import from a spreadsheet
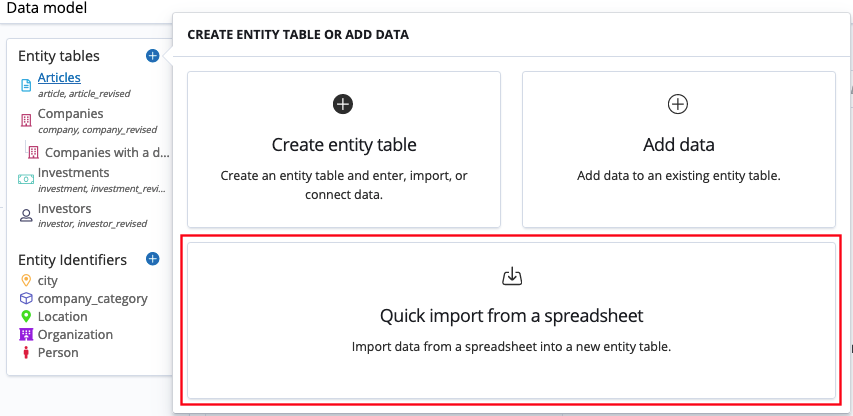
This option imports data and creates an entity table simultaneously.
-
Click Quick import from a spreadsheet.
-
Select a file from your system or drag and drop it into the screen.
-
If the file is a spreadsheet, select the sheet to import.
-
(Optional) Configure the following options:
-
Apply header as field names: If selected, the first row of the file will be used to define the field names.
-
Specify a custom delimiter: In cases where commas are not the delimiter in the uploaded file, you can specify another type. Enter the delimiter character in this field, for example a vertical bar (
|) or a colon (:). -
Specify the columns to be loaded as text: Specify the columns you want to be imported as text.
-
Specify the columns to exclude: Specify the columns that you do not want to include in the import.
-
-
Click Add fields.
-
Specify a name for the entity table.
-
Define the types of data in each field. For more information, see Mapping data in fields.
-
(Optional) Define an advanced mapping for fields if required.
-
Continue the import process by selecting one of the following options:
-
Create structure only: Creates an index with the defined mapping, but no records will be imported.
-
Next: Creates an index with the defined mapping and moves on to the transform stage of the import process.
-
After you create an entity table, you can modify the icon, color, and other values. For more information, see Editing entity tables.
Importing data from a datasource
Your system must be configured to connect to an Avatica datasource. For more information, see Working with JDBC datasources.
-
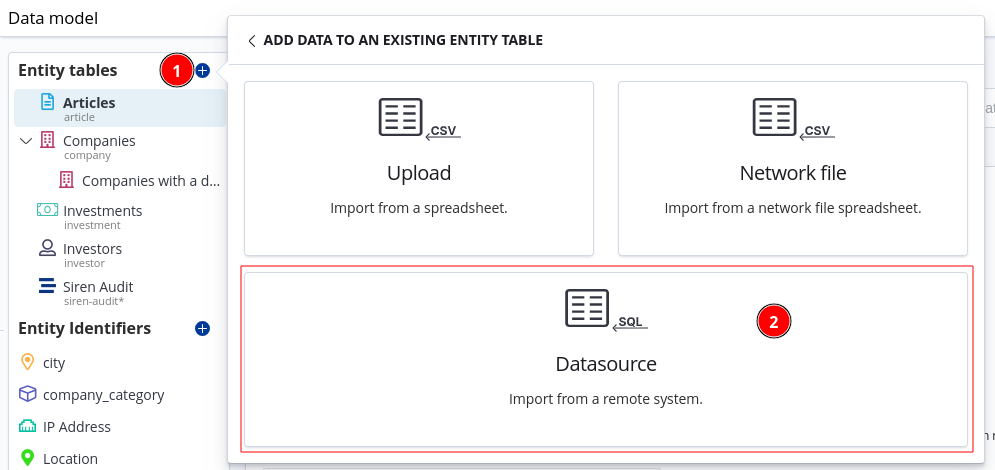
In the Data model app, click Add/Create (the plus symbol).
-
Click Add data.
-
Click Datasource.
-
Select the JDBC datasource and write a query for the datasource in the Query editor. For more information, see Writing a query.
-
Click Fetch. If the query is valid, samples appear below.
-
Click Add the above fields(s) to populate the Field mapping table.
-
Click Next to continue to the transform stage.
Importing data from server
|
This feature is |
-
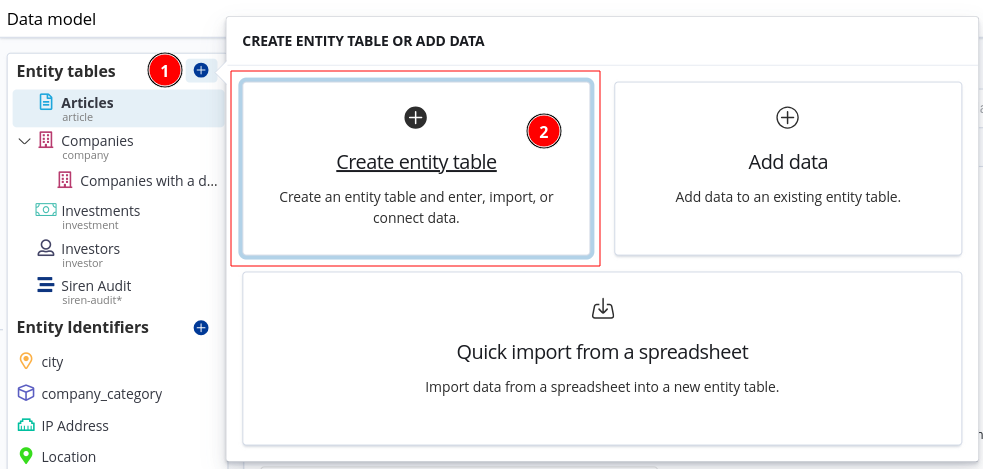
Click Add/Create (plus symbol) on the top right corner of Entity tables.
-
Click Create entity table.
-
Click A new table.

Data model definition
-
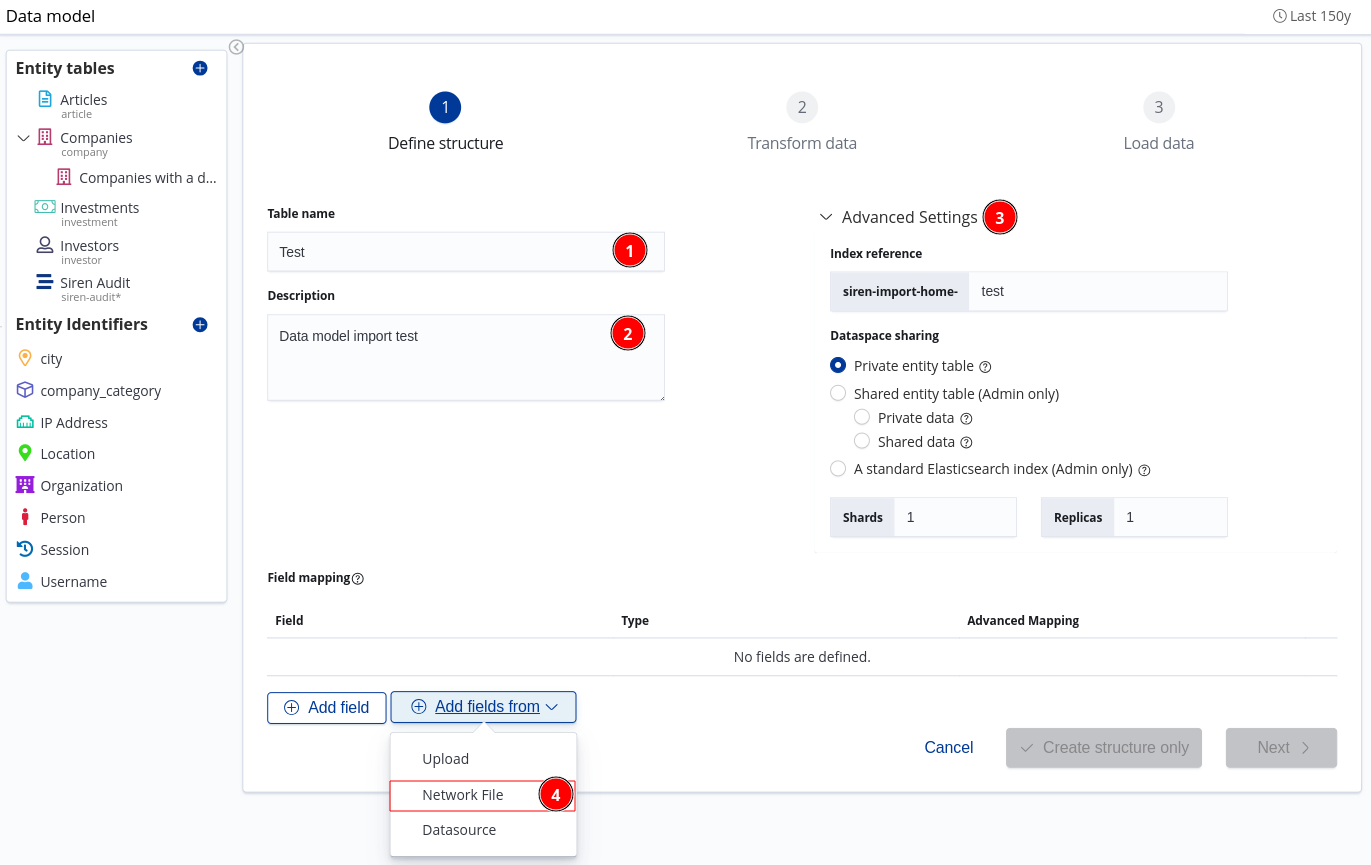
Specify the name for the entity table.
-
(Optional) Write some description for the new entity.
-
(Optional) Change Advanced Settings:
-
Index reference: Sufix for the new index name.
-
Dataspace sharing: Dataspace import options.
-
-
Click Add fields from and select Network File.
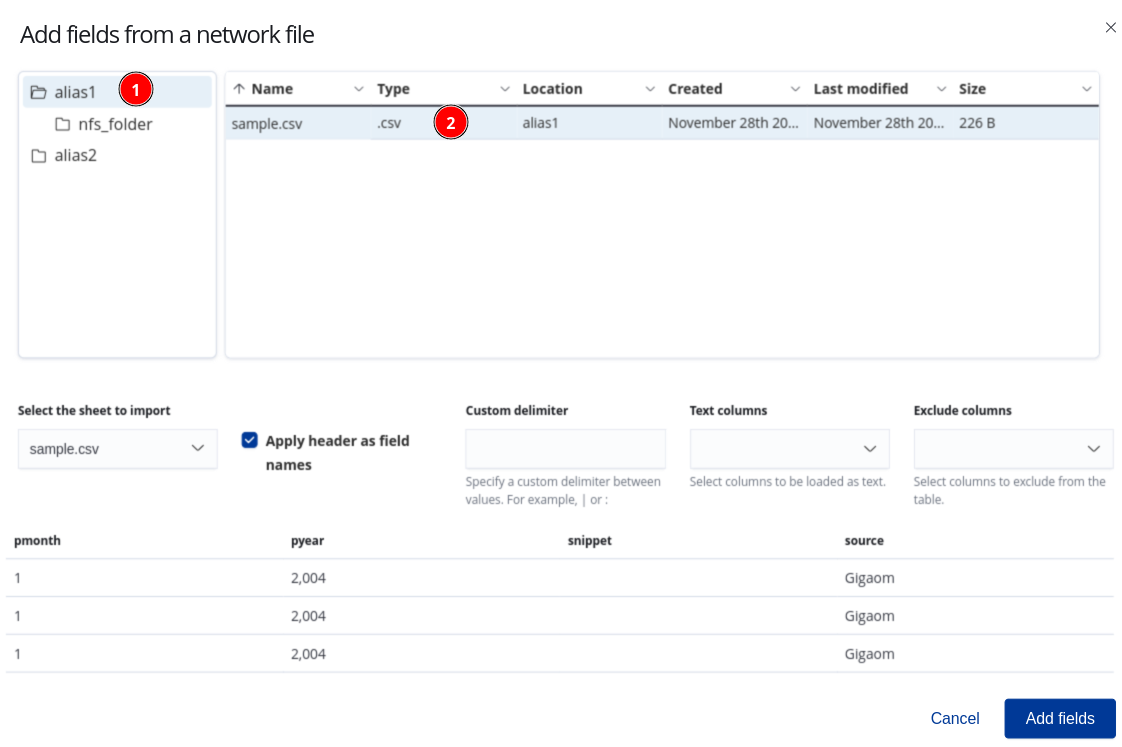
Adding fields from a network file
|
For aliases, directories and other configurations refer to Configuring Siren Investigate . |
-
Select an directory alias.
-
Click the file to import. Hidden files on the server won’t be loaded here (Only supported on Linux).
-
If the file is a spreadsheet, select the sheet to import.
-
(Optional) Configure the following options:
-
Apply header as field names: If selected, the first row of the file will be used to define the field names.
-
Specify a custom delimiter: In cases where commas are not the delimiter in the uploaded file, you can specify another type. Enter the delimiter character in this field, for example a vertical bar (
|) or a colon (:). -
Specify the columns to be loaded as text: Specify the columns you want to be imported as text.
-
Specify the columns to exclude: Specify the columns that you do not want to include in the import.
-
-
Click Add fields to continue to the Field mappings stage.
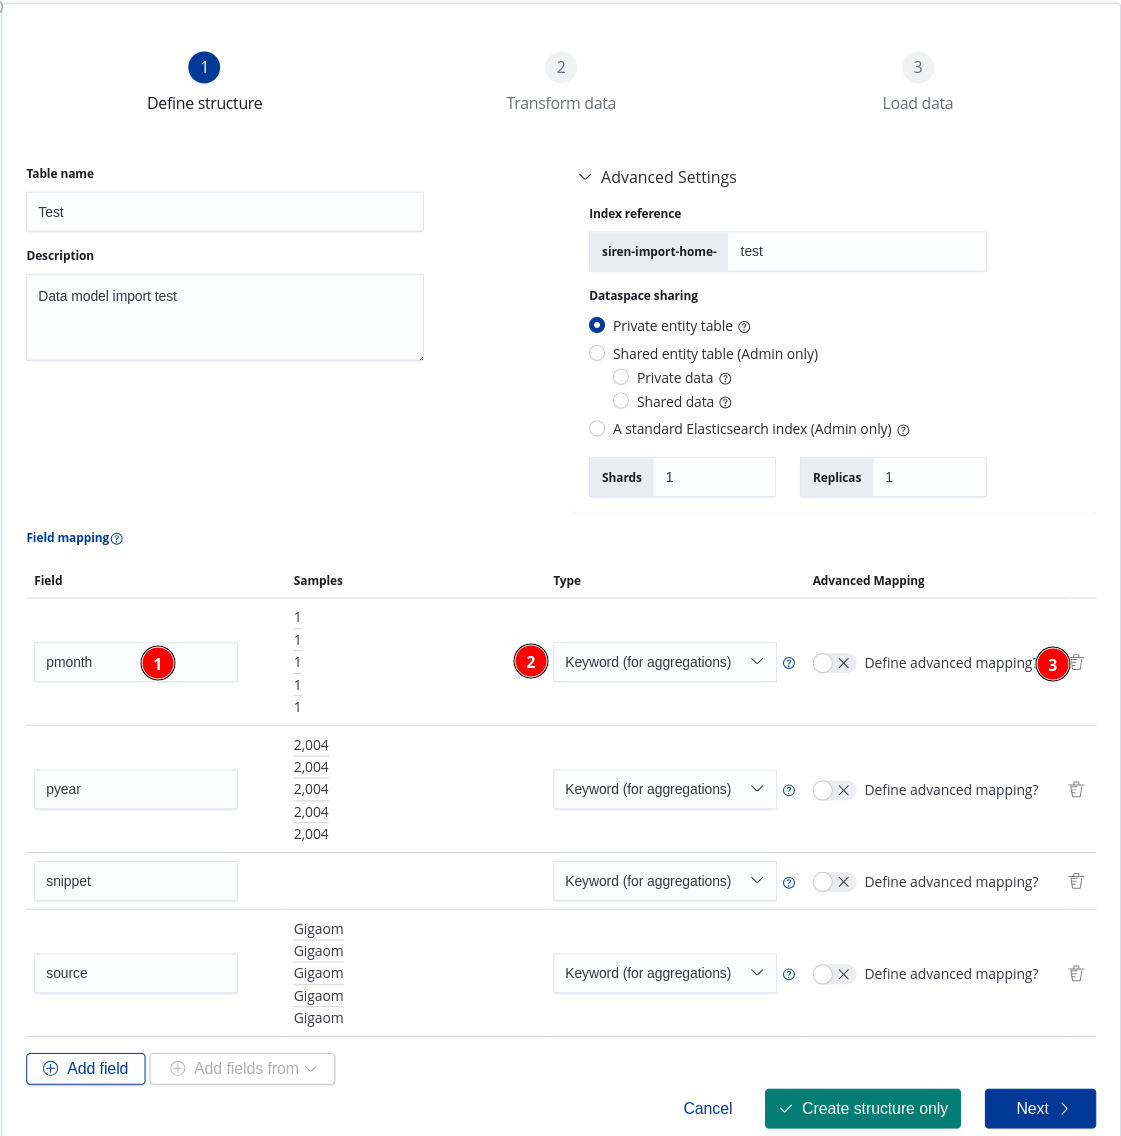
Field mappings
-
(Optional) Specify the field name.
-
Define the types of data in each field. For more information, see Mapping data in fields.
-
(Optional) Define an advanced mapping for fields if required.
-
Continue the import process by selecting one of the following options:
-
Create structure only: Creates an index with the defined mapping, but no records will be imported.
-
Next: Creates an index with the defined mapping and moves on to the transform stage of the import process.
-
After you create an entity table, you can modify the icon, color, and other values. For more information, see Editing entity tables.
Transforming the data
Data transformation is the process of modifying and curating source data before it is imported into Siren Investigate.
On the Transform data screen, you can use field scripts or a transform pipeline to change the data from its source format to its imported format.
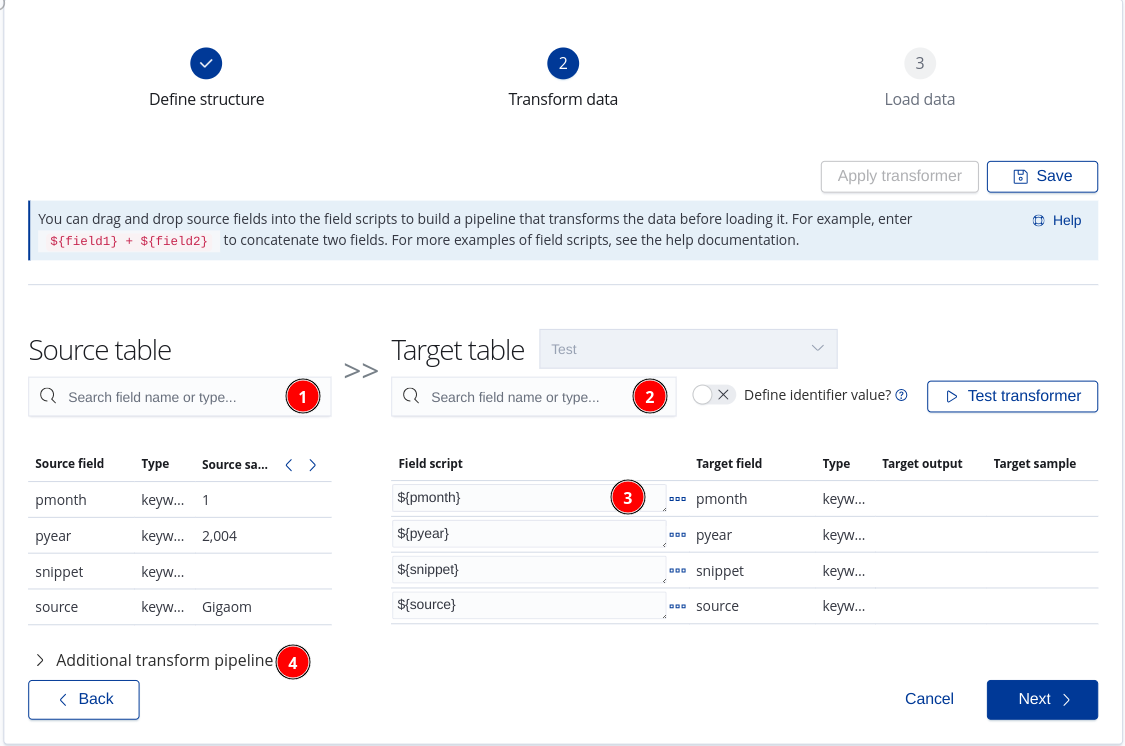
Two tables are displayed:
-
Source table: Contains the field names, field types, and a sample of the data in each field that you are importing.
-
Target table: Allows you to configure the source data to make it more useful in your analysis. This is where you can apply field scripts to modify the data before it is loaded. You can test the transform to make sure that the target sample is in the exact format that you need.
If you are adding data into an existing entity table, you can select the table from the Target table dropdown menu.
If you are importing data into a new entity table, the contents of the target table are already determined and the Target table dropdown menu is deactivated.
The following options are available on the Transform data screen:
-
Saved transformers: If you set up a transform that you are satisfied with, you can save the transformer for later use by clicking Save as. To reuse a saved transformer later, select it from the dropdown menu.
In the place of import templates, Siren Investigate now uses saved transformers to help you to streamline imports of similar data sets. Read about the breaking changes in the release notes.
-
Define identifier value: Use this option to assign a custom record ID. Records that contain the same ID will be replaced when data is loaded;
-
Field script: You can configure field-specific transformations. For examples of what you can enter here, see Field script examples. To access more options, click the ellipsis button (
...). -
Test transformer: Runs the values in the Source samples column of the source table through the configured field scripts. The output can be viewed in the Target output column.
-
Multi-valued: If a source field contains multiple values in string form, the values can be separated into an array based on the delimiter that you specify. For example, you might have an email field that contains
mario@bros.io|mario.bros@mail.io|info@mario.io. By switching the Multi-valued switch on and specifying the delimiter as a vertical bar|, you can parse these three values as separate email addresses. -
Parse as JSON: Select this option when your field is a JSON object in string form.
-
NLP: If natural language processing (NLP) is configured, select this option to indicate that you want to use this field during NLP. For more information, see the Siren NLP plugin.
-
-
Target field: The name of the field in the target table.
-
Type: The type of data contained in the field.
-
Target output: See Previewing transformed data.
-
Target sample: The value of the field in the target table after transformation.
|
If the index pattern is based on a single index or a revision index, target tables are available from the dropdown menu. For more information about revision indices, see
Setting up record editing.
Multiple indices are not supported, therefore index patterns that contain an asterisk ( |
Field script examples
You can drag and drop source fields into the field scripts to build a pipeline that transforms the data before loading it. For example, enter ${field1} + ${field2} to concatenate two fields.
Field scripts must be composed by using the Painless scripting language. Javascript template literals are used to represent the value of fields. This section provides some examples.
After you populate the field scripts, click Test transformer to view the updated data in the Target sample column.
General
You can use a field script transformer to perform the following general operations and many more like these:
| Example | Description |
|---|---|
|
Concatenates two fields. |
|
Concatenates two fields and replaces null values with an empty string. |
|
Converts a string to a number. |
|
Remove whitespace from both ends of a string. |
|
Round up a floating point to two decimal places. |
|
Converts a number to a string. |
|
Converts a number to a string and gets the length of the string. |
Geopoint field type
You can use a field script transformer to merge latitude and longitude fields to create a single Elasticsearch geo_point. The source fields: latitude, longitude are used in the examples below:
| Example | Description |
|---|---|
|
Geopoint as an array type. |
|
Geopoint as a WKT POINT primitive. |
|
Geopoint as a string type. This example ensures that both fields contain values before a Geopoint type is created. |
Date field type
You can also use a field script transformer along with Datetime API to transform date fields. The field in the Elasticsearch index is mapped with multiple format types - yyyy-MM-dd HH:mm:ss||yyyy-MM-dd - as outlined in
Elasticsearch’s multiple date format documentation. The source fields: Date, day, month, year, hour, min, sec, millis, nanos are used in the examples below:
| Example | Description |
|---|---|
|
If all fields are in one of the specified formats in the CSV file, it is possible to pass the value from the source directly through to Elasticsearch. |
|
An example of how you can format the values into |
|
Building on the previous example, the ternary statements add a |
|
An example of how you can use individual fields that contain the pieces of a date to create the date string in the format |
|
If the calculated date string requires a specific timezone, it can be done by using |
|
You can also define the actual date format for output as it is defined in this example by using |
|
If the datetime value is provided as the datetime string and you want to store only a specific piece of the date, you can get that value by using methods such as |
|
You can combine the pieces of parsed date that were extracted by the previous example and get any custom date format. The output of this example will be in the format |
|
An example of how you can manage a custom date string provided by a data sample and convert it to some other expected date formats or proceed by any of the supported methods above. The output of this example will be in the format |
|
This example shows how to build the date string by using only the milliseconds. The output can be managed by using the methods described in the examples above. The output of this example will be in the format |
Configuring an additional transform pipeline
You can enrich a document before it is imported by defining an additional transform pipeline. For more information, see Sample transform pipelines.
Previewing transformed data
After you have configured a transform pipeline, you can preview the results by clicking Test Transformer. The result is displayed in the Target output column.
Or, if you have configured an additional transform pipeline, click Test to do the same.
Click Next to continue to the Loading the data stage.
Loading the data
-
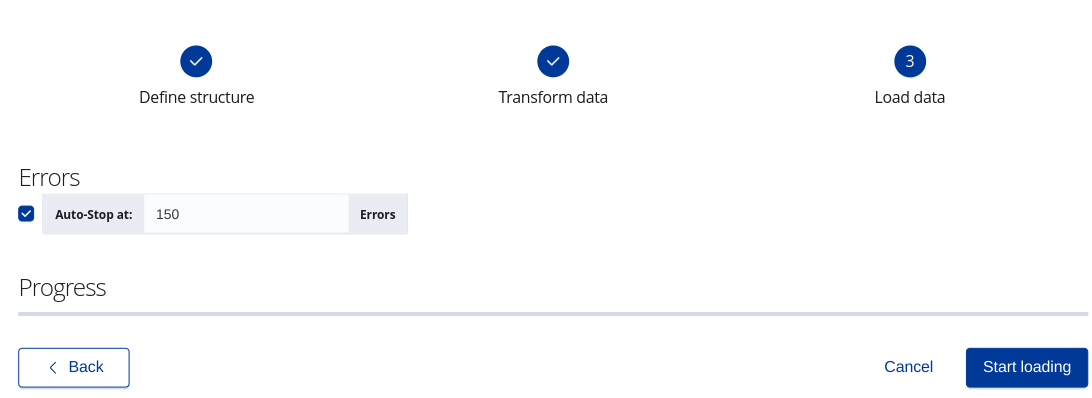
When you click Start loading, the import process starts and is tracked by a progress bar.
-
During this process you can click on:
-
Cancel: Exit the import process. You can then save or delete the table optionaly.
-
Stop: Stop importing data after the import process starts.
-
|
If you are importing data from a datasource and you navigate away from this screen, you can continue to run the import process in the background. You can check the status of datasource import jobs on the Datasource Reflection Jobs screen of the Data import app. |
After the import process is complete, the entity table that contains the imported data is displayed.
If errors are displayed to indicate that certain records (rows) are not conforming to your mappings, you can return to the previous step and update the mapping type in the Target table.
You can increase Auto-Stop at to a number of errors according to the data being imported.